
Scratchbox Complete User & Faculty Handbook
The complete step-by-step operating guide for Institute Admins, Teachers, Moderators, and Students.
📑 Table of Contents
1. Introduction to Scratchbox
Scratchbox is an all-in-one digital coding lab and automated grading platform built specifically for colleges, universities, and technical institutes.
1.1 Why do colleges use Scratchbox?
In traditional computer science labs, teachers and students face several common problems:
- Installation headaches: Students spend hours installing compilers, JDKs, Python environments, and database tools on their laptops.
- Slow grading: Teachers have to manually run hundreds of student files, which takes days.
- Cheating during exams: Students copy code from classmates or open external browser tabs.
- Lack of visibility: Teachers don't know who is stuck or who hasn't started until the deadline has passed.
Scratchbox solves all of these problems by running everything in the cloud. Students open their browser, write code in a clean editor, and get instant feedback. Teachers can create tests, monitor students in real time, and download complete grade sheets with one click.
1.2 Supported Programming Languages
Scratchbox comes pre-configured with ready-to-use environments for all major computer science subjects:
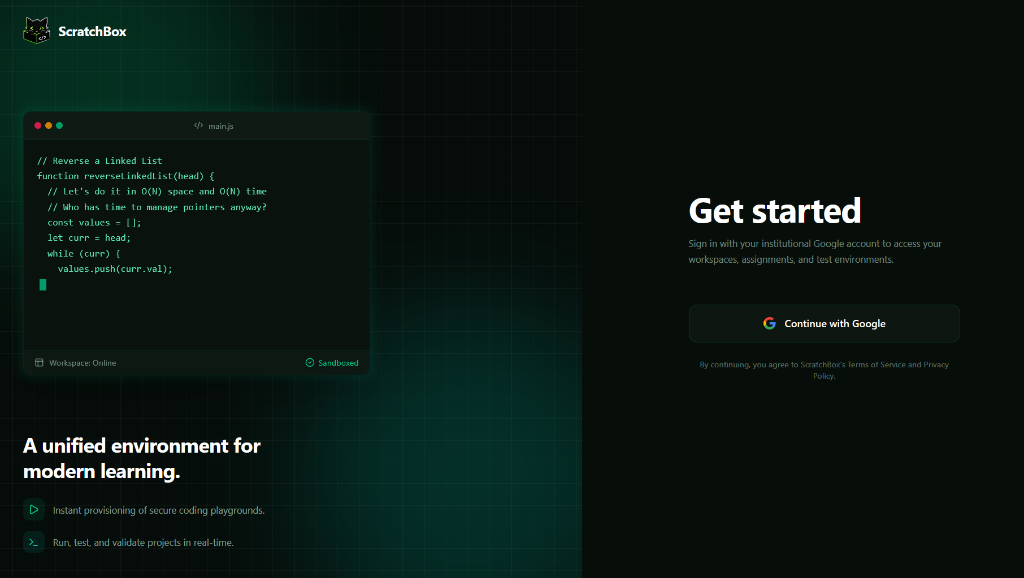
Figure 1.1: Scratchbox Welcome & Google Sign-In Portal — platform.scratchbox.app
2. Onboarding Guide (Google Sign-In & Role Enrollment)
All college users (Students, Teachers, Moderators, and Institute Admins) sign in using Google Sign-In with their official college email address. On their very first login, users select their role. Here is the exact enrollment workflow for each role:
Teacher & Moderator Onboarding (Institution Code Method)
Faculty members and lab moderators use a special Institution Invite Code provided by their Institute Admin to get enrolled:
- Sign In with Google: Click "Continue with Google" on the login page and choose your official college email ID.
- Select Role: On the Role Selection screen, click on the "Teacher" or "Moderator" card.
- Enter Institution Invite Code: A required "Invite Code" field will appear. Enter the Institution Code given to you by your Institute Administrator. (This is the only way teachers and moderators can enroll into their institution's workspace).
- Access Teacher Workspace: Click "Continue". You are immediately taken to your Teacher Dashboard (
/teacher), where you can view your assigned courses, create coding labs, and monitor students.
Institute Admin Onboarding (Promotion by Super Admin)
The Institute Administrator sets up and manages the college domain on Scratchbox:
- Initial Sign In: The designated administrator signs in with Google using their official college email and initially selects the "Student" role.
- Super Admin Role Elevation: The Scratchbox platform Super Admin promotes this user account to the "Institute Admin" role for their college.
- Access Admin Dashboard: Upon their next login (or page refresh), the user is automatically routed to the Institute Admin Dashboard (
/institute_admin). - Distributing Institution Codes: Inside the Institute Admin dashboard, the admin can copy the Institution Invite Code to share with their teachers and faculty members.
Student Onboarding (Batch Invite Code Method)
Students enroll into their specific class sections without needing an institution code:
- Sign In with Google: Click "Continue with Google" using your college email address.
- Select "Student": On the Role Selection screen, click "Student" and click Continue. (No institution code needed).
- Join Batch with 6-Character Code: On your student home dashboard, click "Join Batch" and enter the unique 6-character Batch Code (e.g.
X9K2P1) provided by your course instructor. - Access Labs & Courses: Your enrolled courses, active lab assignments, and deadlines will instantly appear. Click on any lab to start coding in the cloud IDE!
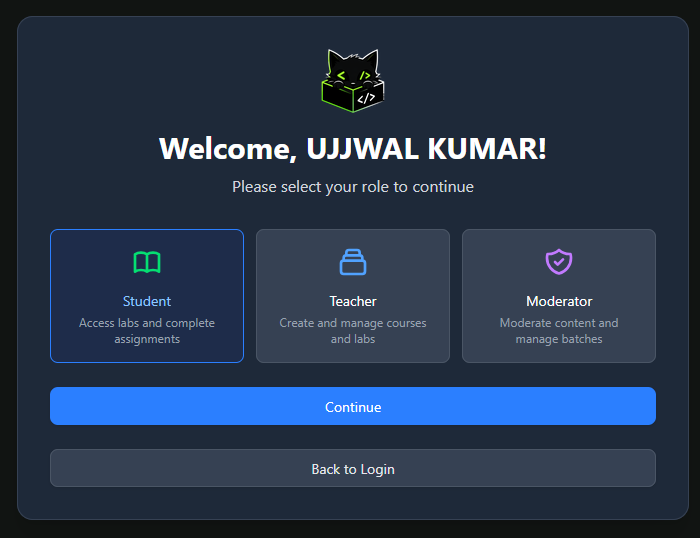
Figure 2.1: First-Time Login Role Selection & Teacher Institution Invite Code Entry
3. Academic Hierarchy & Permissions
Scratchbox organizes academic coursework in a simple 5-step hierarchy:
Institution
Your college or university campus domain (e.g. ABC Institute of Technology).
Batches (Cohorts)
Classes or groups of students (e.g. Computer Science 2026 - Section A). Each batch has a unique 6-character code.
Courses (Subjects)
The subjects being taught (e.g. Data Structures & Algorithms, Web Development). Courses are assigned to batches.
Labs & MCQs
Coding assignments, weekly practicals, or quizzes with deadlines and grading rules.
Questions & Test Cases
Individual coding problems, starter files, sample inputs, and hidden automated test cases.
3.1 Role Comparison Table
| Action | Institute Admin | Teacher / Trainer | Moderator | Student |
|---|---|---|---|---|
| Create Batches & Invite Codes | ✅ | ✅ | ❌ | ❌ |
| Create Courses & Assign Faculty | ✅ | ✅ | ❌ | ❌ |
| Create & Edit Labs & Questions | ✅ | ✅ | ✅ | ❌ |
| Set Anti-Cheat Rules & Deadlines | ✅ | ✅ | ✅ | ❌ |
| Inspect Student Submissions & Code | ✅ | ✅ | ✅ | ❌ |
| Export Gradebook CSV | ✅ | ✅ | ✅ | ❌ |
| View Institute-Wide Attendance | ✅ | ❌ | ❌ | ❌ |
| Solve Labs & Submit Code | ❌ | ❌ | ❌ | ✅ |
| Daily Streak & Leaderboards | ❌ | ❌ | ❌ | ✅ |
4. Institute Administrator Manual
As an Institute Admin, you are responsible for setting up student batches, maintaining the course list, adding teachers, and reviewing institute-wide attendance.
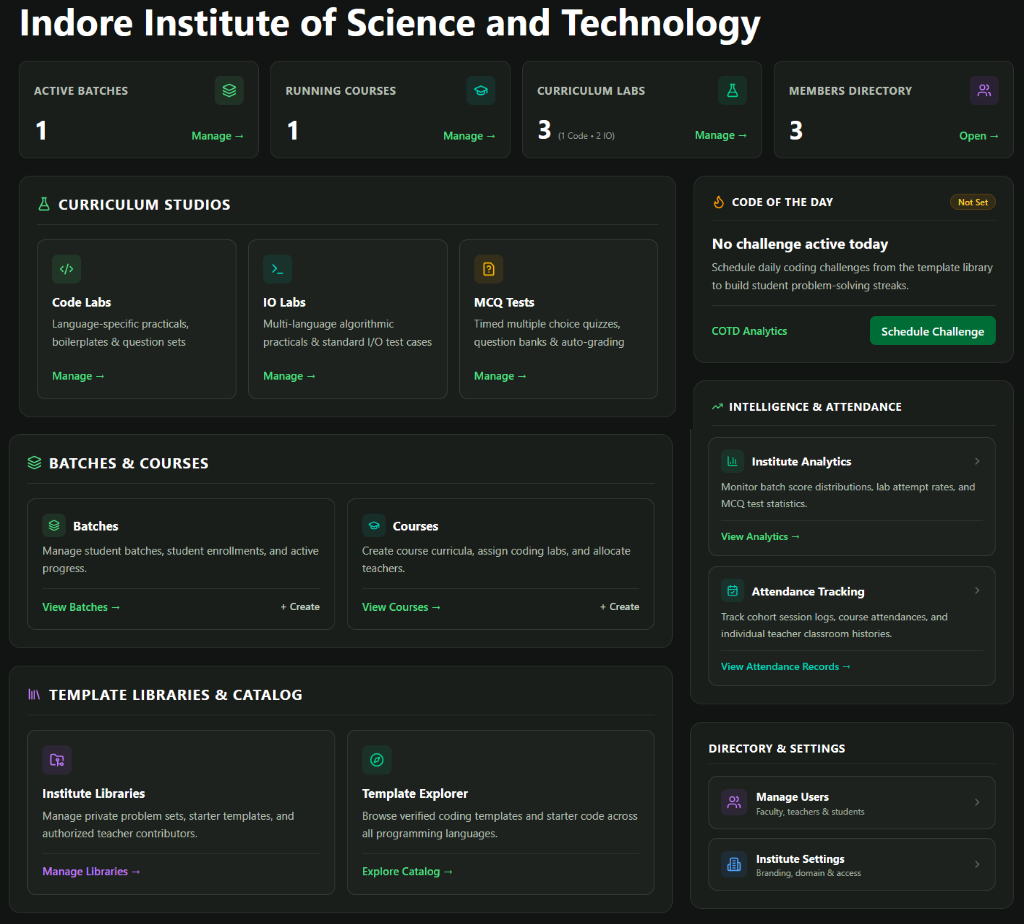
Figure 4.1: Institute Administrator Main Command Dashboard
4.1 Creating & Managing Batches
What is it? A Batch represents a classroom section or cohort of students (e.g. Section 3A or Batch 2026).
Why use it? It allows you to organize hundreds of students into manageable groups and assign courses to them all at once.
Step-by-Step Instructions:
- Click Batches in the top navigation bar (
/institute_admin/batches). - Click the "+ Create Batch" button in the top right.
- Enter a Batch Name (e.g.
CSE-2026-Section-A) and an optional description. - Click Save. The system will automatically generate a unique 6-character invite code (like
K7M3Q9). - Share this 6-character code with your students so they can join.
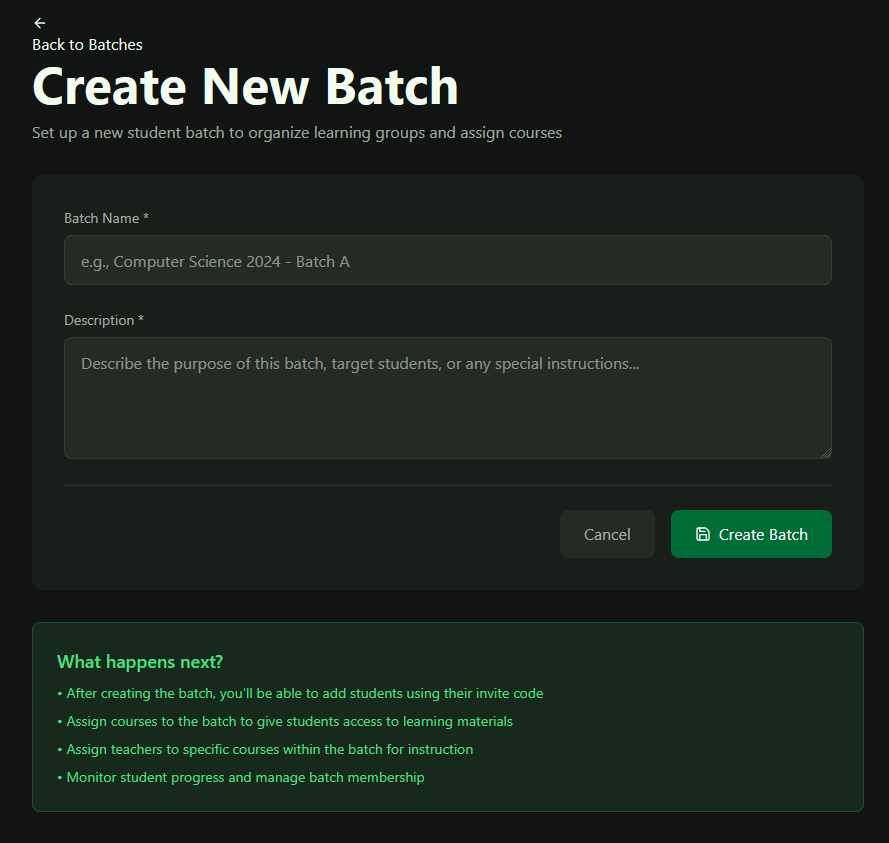
Figure 4.2a: Batch Creation Form
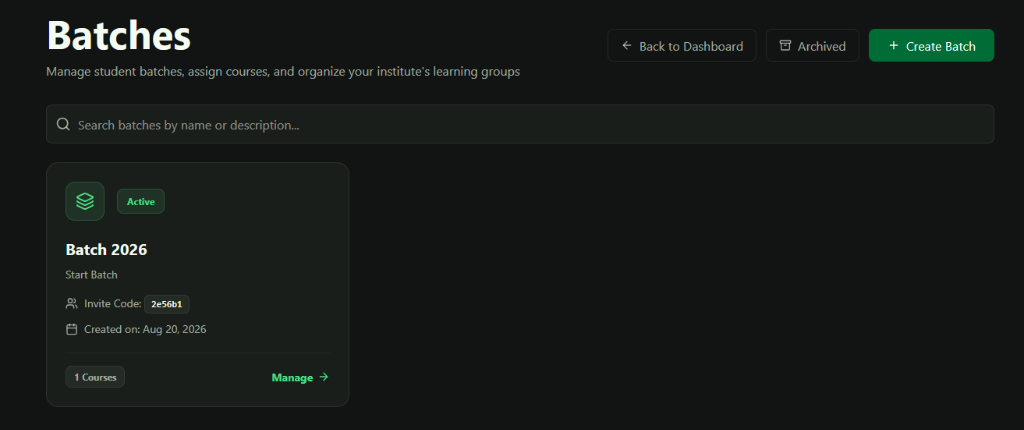
Figure 4.2b: Batch Card with 6-Character Invite Code
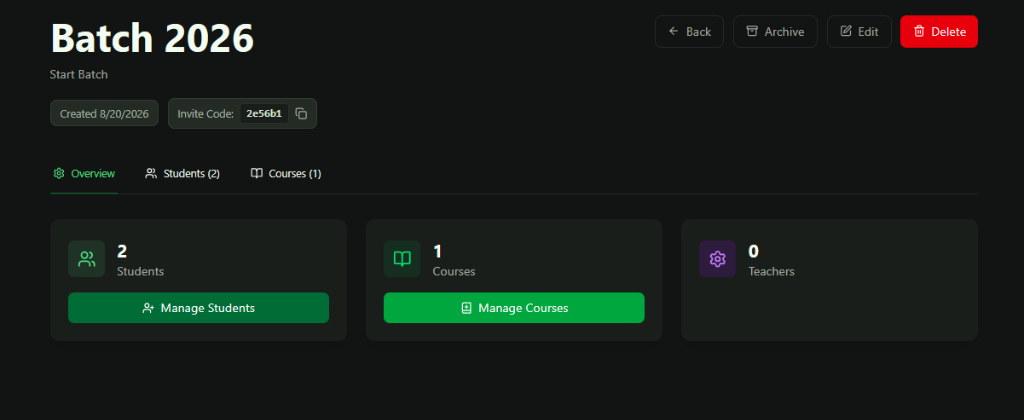
Figure 4.2c: Inside Batch Management View (Enrolled Students, Assigned Courses & Quick Actions)
Key Features Inside the Batch Workspace:
- Invite Code Badge: Displays the unique 6-character code (e.g.
2e56b1) with a 1-click copy button to share with students. - Top Action Buttons: Quick buttons to Archive (semester rollover), Edit (batch name/details), or Delete the cohort.
- Students Tab & Counter: Click "Manage Students" to view enrolled student profiles, join dates, and manage cohort membership.
- Courses Tab & Counter: Click "Manage Courses" to link curriculum subjects directly to this batch so all students gain instant access to labs and assignments.
4.2 Academic Periods & Archiving
What is it? A feature to transition a batch from one semester/term to the next (e.g. Semester 1 → Semester 2).
Why use it? It resets the active classroom views for the new term while keeping all historical scores and attendance completely safe in the archive.
Step-by-Step Instructions:
- Open the batch details page.
- Click "Archive / Increment Period".
- Enter the new period number and name (e.g.
Semester 2 - Spring 2026). - Confirm the action. Past records are safely archived and viewable anytime under historical reports.
4.3 Managing the Course Catalog & Teacher Course Enrollment
What is it? The master list of subjects offered by your department (e.g. Data Structures & Algorithms, Web Development).
Why use it? Courses organize coding labs and student assignments. Teachers join courses using unique course invite codes provided by the Institute Admin.
How Institute Admins Create Courses:
- Click Courses in the top navigation bar (
/institute_admin/courses). - Click "+ Create Course".
- Enter the Course Name and a brief description, then click Save.
- The course is assigned a unique Course Code. The Institute Admin shares this code with the respective teacher or trainer.
How Teachers Join a Course (Course Code Method):
- In the Teacher portal (
/teacher/courses), click "+ Join Course" (or "Join Your First Course"). - Enter the Course Code provided by your Institute Admin.
- Click Join Course. The course instantly appears in your teacher dashboard, allowing you to create labs, assign MCQs, and grade students.
4.4 Multi-Tier Attendance Tracking
What is it? An automated attendance analytics dashboard for college leadership.
Why use it? It provides instant visibility into student attendance across four granular views without having to manually compile paper registers.
How to view attendance:
- Go to Overall Attendance (
/institute_admin/overall-attendance). - Overall View: Shows campus-wide daily attendance percentages.
- Teacher-Wise View: Shows attendance records marked during each teacher's lectures.
- Batch-Wise View: Compares attendance across different student sections.
- Course-Wise View: Shows attendance history for individual subjects.
5. Faculty Guide: Creating Labs & Questions
Teachers and trainers can create assignments, coding exams, and quizzes in three distinct modalities.
5.1 Standard Multi-File Coding Labs
What is it? Labs where students write real code in a specific language (like Python, Java, C++, or JavaScript) evaluated by industry testing frameworks (PyTest, JUnit, Jest).
Why use it? Perfect for project-based learning, multi-file codebases, object-oriented programming, and real software engineering tests.
Complete 4-Step Lab & Question Creation Guide:
Go to Labs (/teacher/labs). You will see all your active curriculum labs with their target programming language and total question count. Click "+ New Lab" to start.
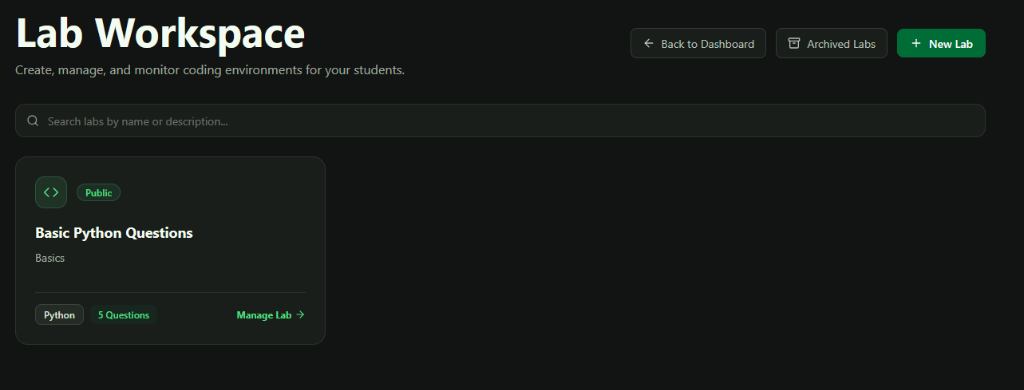
Figure 5.1a: Teacher Lab Workspace & Active Lab Cards
Inside the lab, you can see all configured questions. You have three ways to add content: manual "+ Add Question", 1-click AI generation with "Add with AI", or importing existing problems via "Add from Library". You can also test any question immediately by clicking "▶ Try It Out".
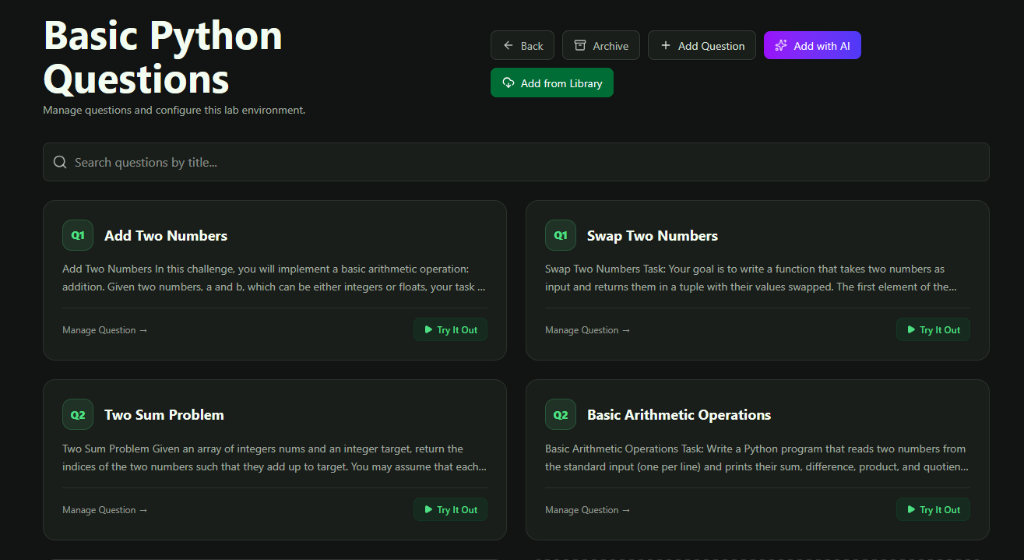
Figure 5.1b: Question Management & Quick Action Toolbar
Click on any question or create a new one. Define the problem description, required function signature (e.g. def add_two_numbers(a, b)), and clear example test cases with input/output explanations.
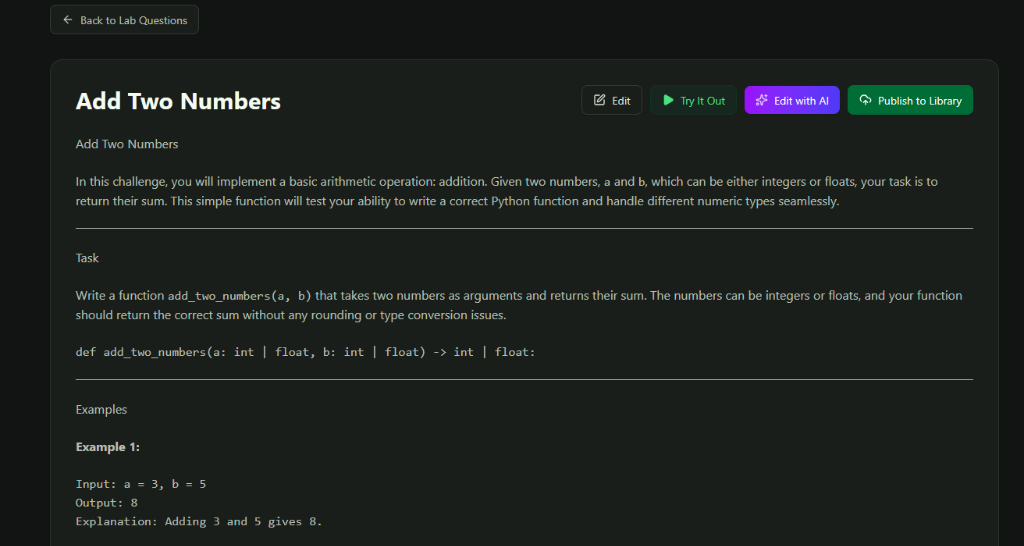
Figure 5.1c: Formatted Problem Statement, Task Definition & Examples
In the bottom configuration panel, you manage both the automated test suites and the starter boilerplate files students receive:
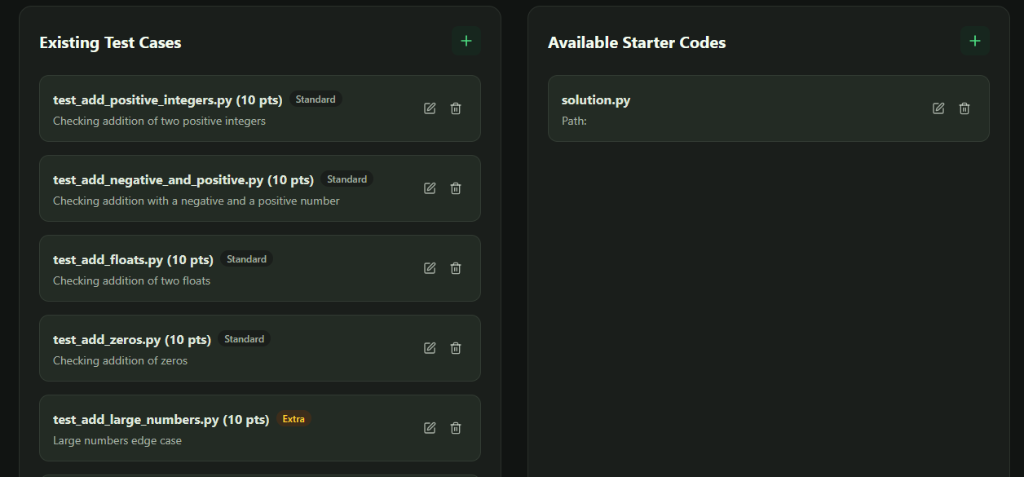
Figure 5.1d: Automated Unit Test Cases & Starter Code Management Panel
A. Adding / Editing Test Cases
Click the green "+" button under Existing Test Cases. Specify the Test Title (e.g. Handles basic addition), point weight (e.g. 10 pts), description, test file name (test_solution.py), and choose the Test Case Type (Standard, Extra Edge Case, or Complexity).
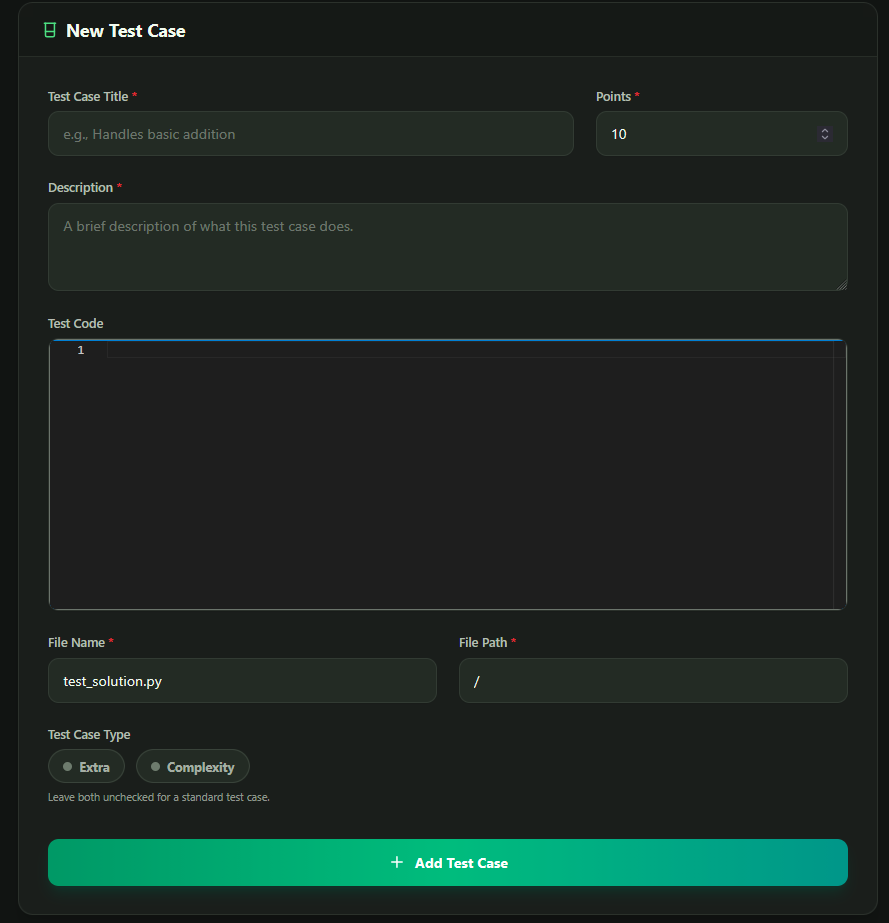
Figure 5.1e: Test Case Creation & Grading Weights Modal
B. Editing Starter Boilerplate Code
Click the edit icon on any starter file under Available Starter Codes. Provide the function skeleton, clear docstrings, # START OF YOUR CODE markers, and helpful sample prints at the bottom so students can immediately run local checks.
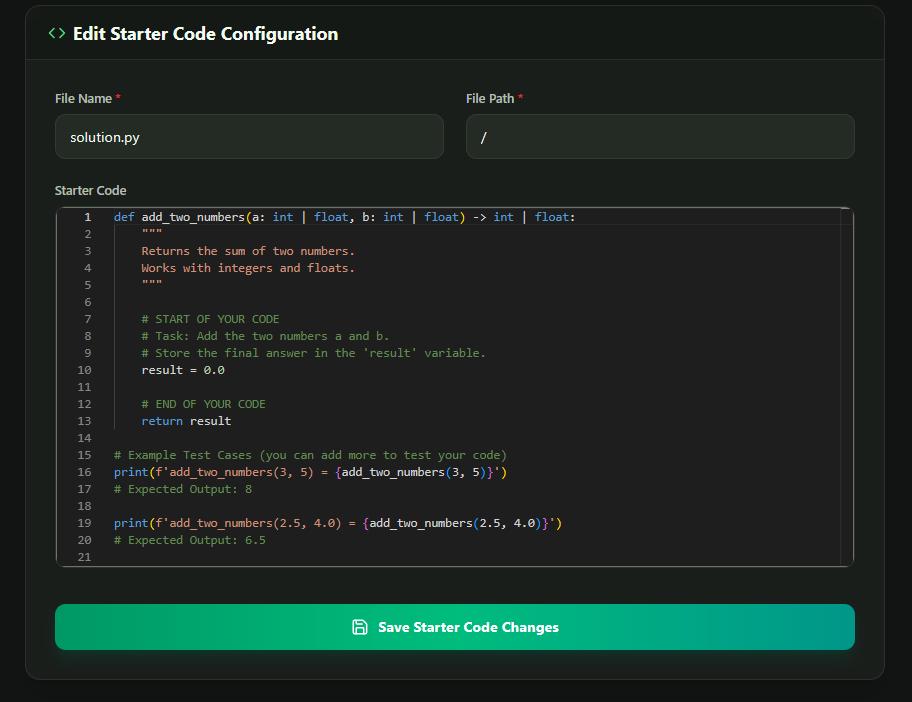
Figure 5.1f: Starter Code & Skeleton Configuration Modal
5.2 Universal IO Labs (Stdin / Stdout)
What is it? Algorithmic problem labs where student code is tested by passing input text (stdin) and comparing the program's output (stdout).
Why use it? Huge advantage: You create the test cases once (Input & Expected Output), and students can solve it in any language (Python, C++, Java, C, JavaScript, Go) without writing separate test harnesses.
Complete 4-Step IO Lab Creation Guide:
Go to IO Labs (/teacher/io-labs). Click "+ New IO Lab" to build a lab manually, or click "Generate with AI" to create an entire IO lab automatically.
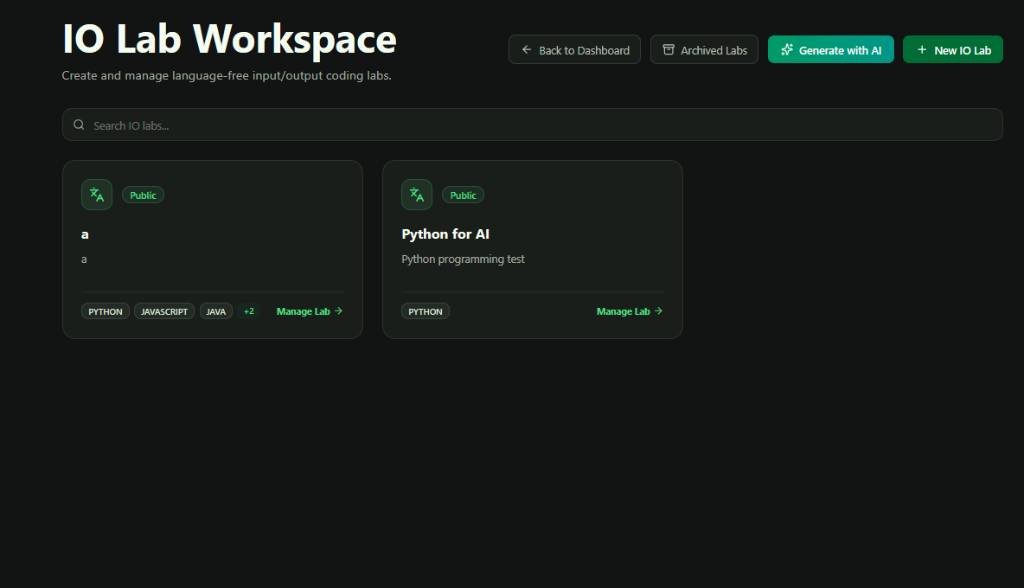
Figure 5.2a: IO Lab Workspace & Language-Free Curriculum Labs
View all questions in the IO lab with point values (e.g. Hello World [10 Pts], Number Sign Check [40 Pts]). Add questions manually, with AI, or from the Global Library, and click "▶ Try It Out" to preview the solver experience.
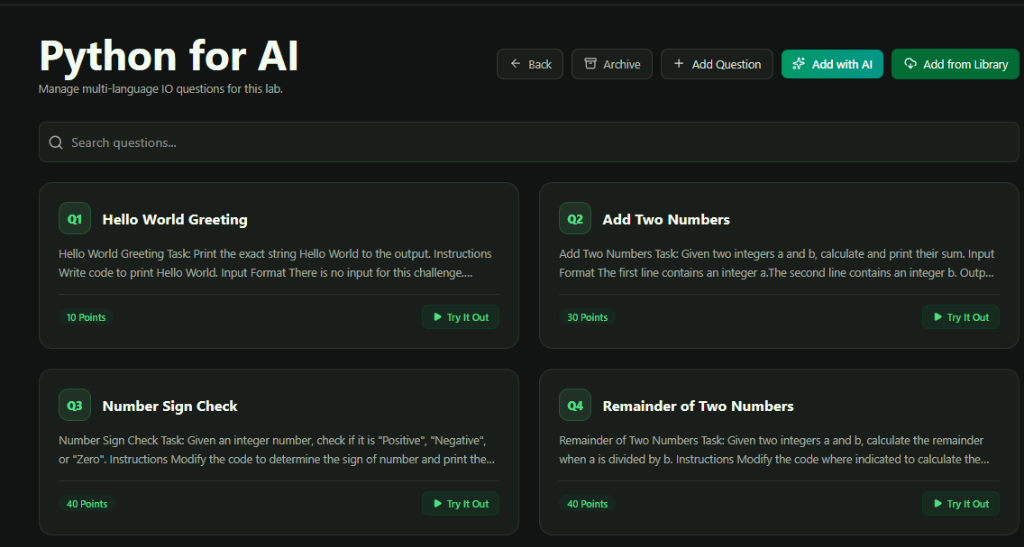
Figure 5.2b: Multi-Language IO Question Catalog & Point Allocations
Clearly document the algorithmic problem with four standard sections: Task, Instructions, Input Format (e.g. Single integer), Output Format (e.g. Positive, Negative, or Zero), and Constraints (e.g. -10^9 <= number <= 10^9).
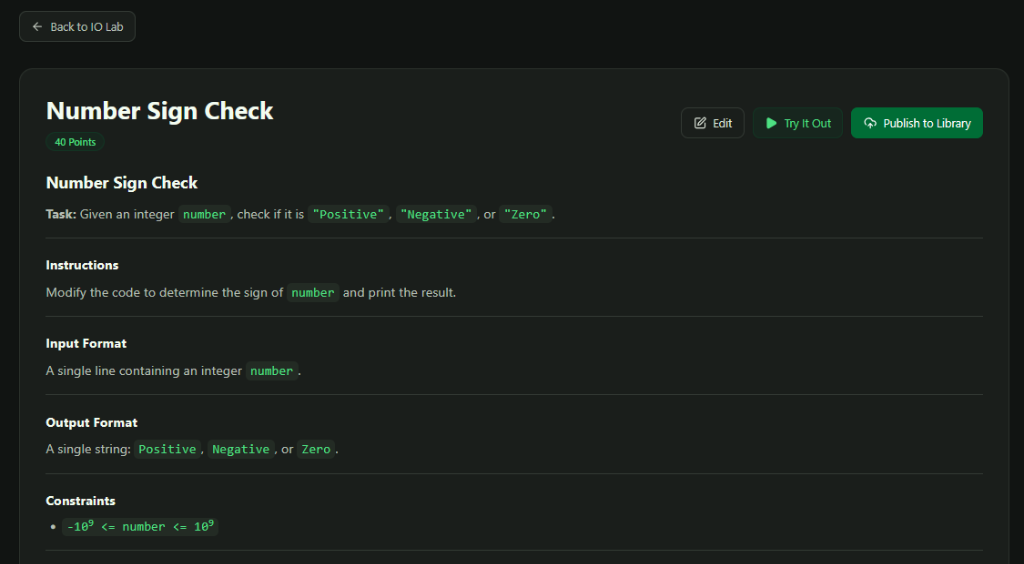
Figure 5.2c: IO Problem Statement, Input/Output Specifications & Constraints
Manage test inputs and automated skeleton files:
- IO Test Cases (Left): Configure public example cases (0 pts) and hidden graded test cases (10 pts each). Click "Generate Another Test Case" for instant AI test synthesis.
- Starter Codes (Right): Use the "AI Boilerplate Options" button to automatically generate ready-to-run starter code for Python, C++, Java, and JavaScript.
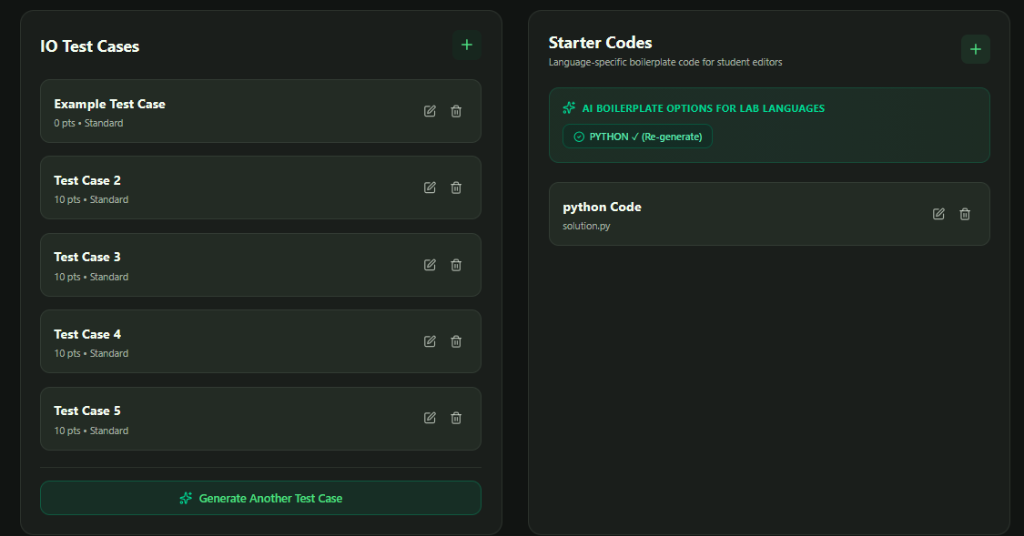
Figure 5.2d: IO Test Cases Panel & Multi-Language AI Boilerplate Generator
5.3 MCQ Quizzes & Theory Checks
What is it? Auto-graded multiple choice quizzes.
Why use it? Great for quick conceptual theory checks, code output prediction quizzes, and mid-term assessments.
Step-by-Step Creation:
- Go to MCQs and click "+ Create MCQ".
- Enter the Quiz Title and description.
- Click "+ Add Question": Enter the question text or code snippet, add the options, and select the radio button for the correct answer.
- Assign the MCQ quiz to any of your course batches.
5.4 1-Click Import from the Global Library
What is it? A built-in repository of hundreds of pre-tested coding challenges.
Why use it? Saves teachers hours of time. You don't need to write problem descriptions or test cases from scratch.
How to use it:
- Open the Global Library tab (
/teacher/library). - Filter by topic (Arrays, Linked Lists, Trees, Dynamic Programming, SQL) or difficulty (Easy, Medium, Hard, Extreme).
- Click "Import to Lab" on any question to instantly copy it into your course assignment.
5.5 The "Try It Out" Pre-Flight Sandbox
What is it? An instructor preview sandbox inside each lab.
Why use it? It allows teachers to test their questions, starter code, and test cases exactly as a student would before publishing it to the class.
How to use it:
Click the "Try It Out" button in the top right of any lab management page. Write your reference solution, run the tests, and verify that it achieves 100/100 points. (Instructor dry-runs do not affect student leaderboards).
6. Lab Settings, Scheduling & Anti-Cheat Engine
When assigning a lab to a class, teachers can adjust rules to make it an open practice exercise or a strictly proctored formal exam.
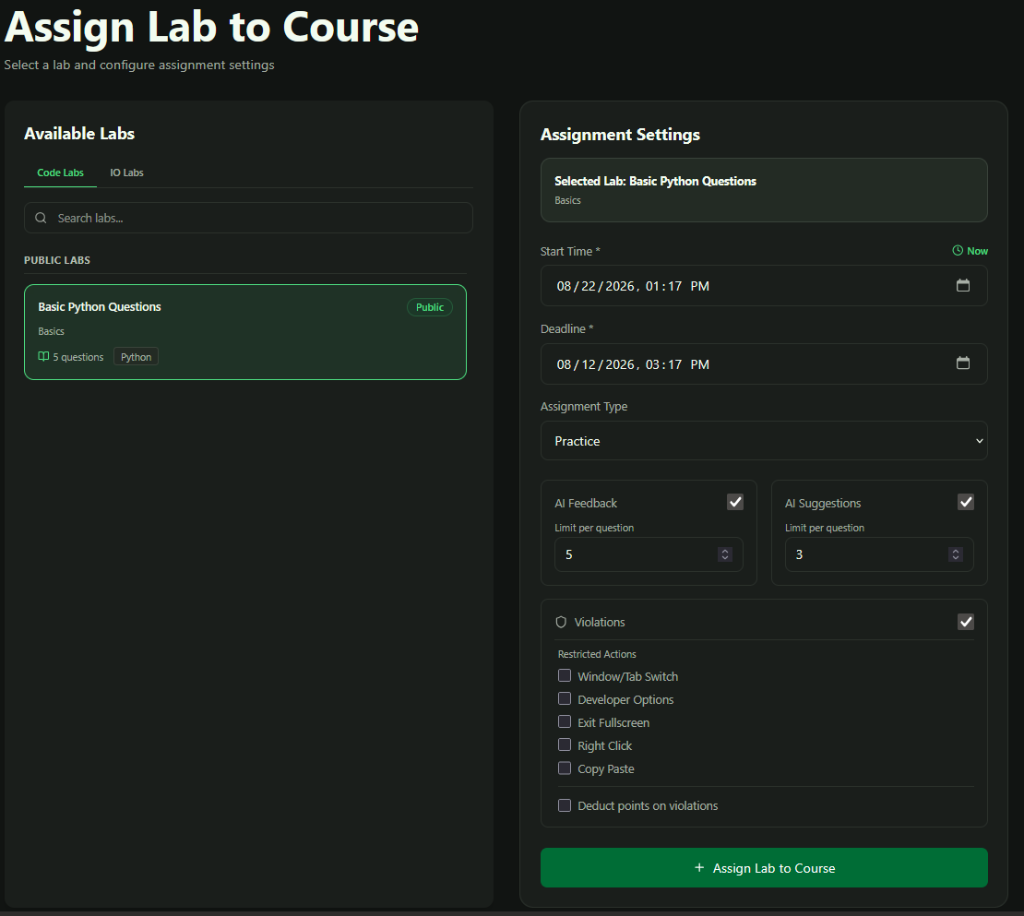
Figure 6.1: Complete Lab Assignment, Scheduling & Anti-Cheat Governance Panel
6.1 Available Labs Selection
What is it? The left panel where you select the exact coding lab to assign to your course.
- Code Labs vs. IO Labs Tabs: Easily switch between language-specific multi-file labs and universal input/output algorithmic labs.
- Search & Filter: Fast search bar to find labs by title or tag. Displays question counts and programming languages.
6.2 Scheduling & Deadlines
What is it? Configuring the start window and hard submission deadline.
- Start Time & "(Now)" Quick Action: Select a future date/time for scheduled release, or click "(Now)" to activate the assignment immediately.
- Deadline (Hard Cutoff): The exact date and time the lab closes. Submissions after this moment are automatically blocked.
- Assignment Type: Choose between Practice (self-paced learning) and Exam (formal evaluation).
6.3 AI Assistant Controls (Per-Question Limits)
What is it? Fine-grained controls over how much ScratchBot AI help students can receive.
- AI Feedback: Toggle automated feedback on student logic and set a maximum limit (e.g. max 5 queries per question).
- AI Suggestions: Enable Socratic debugging hints and set a question limit (e.g. max 3 suggestions per question).
- Exam Mode Lockdown: Uncheck both boxes during formal exams so students solve problems completely independently.
6.4 Anti-Cheat & Proctoring Rules Engine
What is it? Automated integrity enforcement tools that monitor and prevent exam cheating.
1. Window / Tab Switch
Detects if a student switches tabs, minimizes the window, or opens another application, logging a strike with an exact timestamp.
2. Developer Options
Blocks browser developer tools (F12, Inspect Element, and Console) to prevent client-side script tampering.
3. Exit Fullscreen
Forces students to stay in fullscreen mode throughout the test and logs an infraction if exited.
4. Right Click & Copy/Paste
Disables right-click context menus and blocks pasting external code from the clipboard into the code editor.
⚖️ Deduct points on violations: When checked, the platform automatically subtracts a configurable penalty percentage from the student's final score for every recorded violation strike.
Finally, click the green "+ Assign Lab to Course" button to deploy the lab to all enrolled student cohorts immediately.
7. Faculty Analytics, Monitoring & Grading
Scratchbox gives instructors real-time visibility into class progress, student struggles, and code submissions.
7.1 Batch & Course Progress Overview
Scratchbox provides an automated analytics command center for every assigned lab, calculating real-time completion rates, class performance distributions, and AI executive summaries.
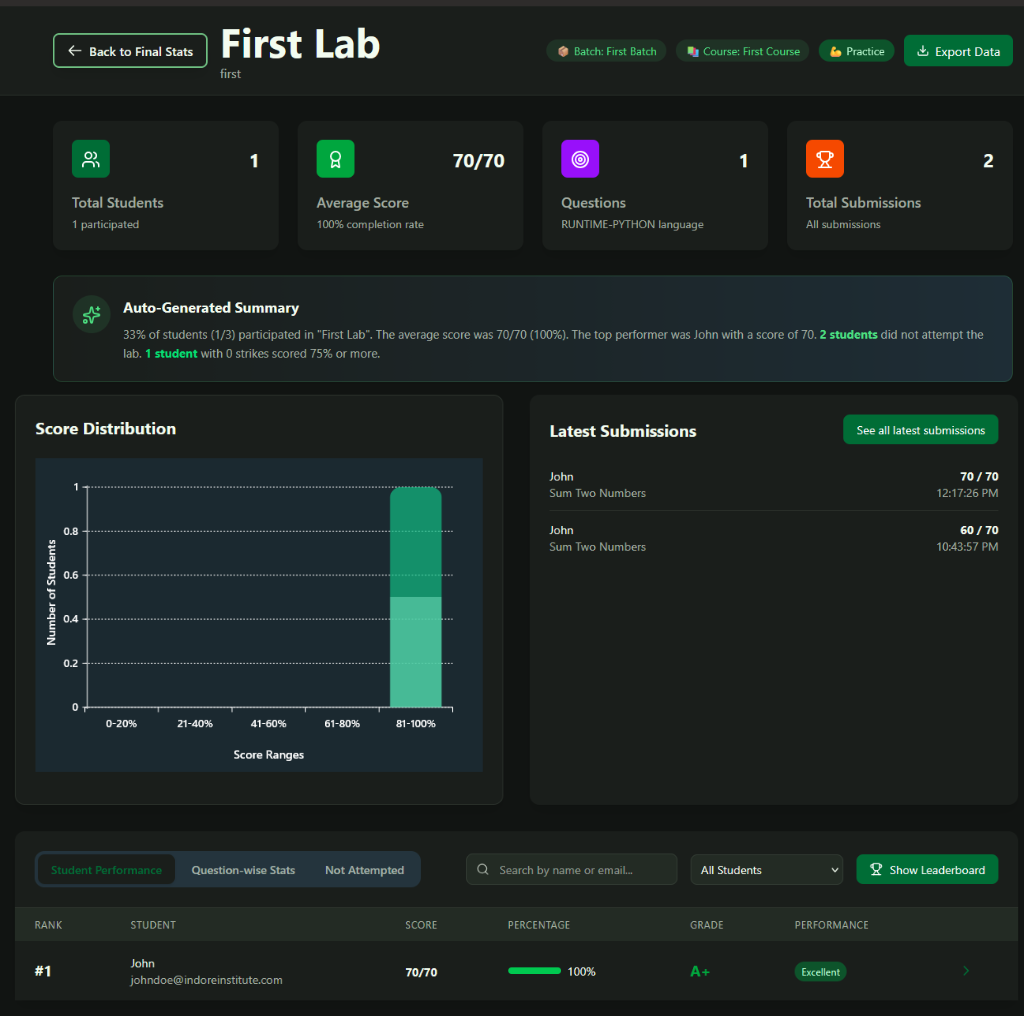
Figure 7.1: Lab Analytics Dashboard (KPIs, AI Summary, Score Distribution & Student Performance)
Executive KPI Cards
Displays Total Enrolled Students, Class Average Score with Completion Rate %, Total Configured Questions with Runtime Environment (e.g. RUNTIME-PYTHON), and Total Submission attempts.
Auto-Generated AI Summary
Natural language briefing detailing student participation percentages, top performers, non-attempted count, and anti-cheat compliance statistics.
Score Distribution Bar Chart
Visual grade brackets (0-20%, 21-40%, 41-60%, 61-80%, 81-100%) to instantly spot whether students are excelling or struggling.
Ranked Student Performance Table
Searchable by student name or email. Displays Campus Rank, Student Name, Raw Score (70/70), Percentage Bar (100%), Letter Grade (A+), and Performance Badge (Excellent).
7.2 The "Not Attempted" / Lazy User Isolation Filter
What is it? A dedicated tab on the analytics page that filters out all students who have not yet started or attempted the assignment.
Why use it? Enables faculty to take proactive intervention before deadlines pass by identifying disengaged students and sending targeted reminders.
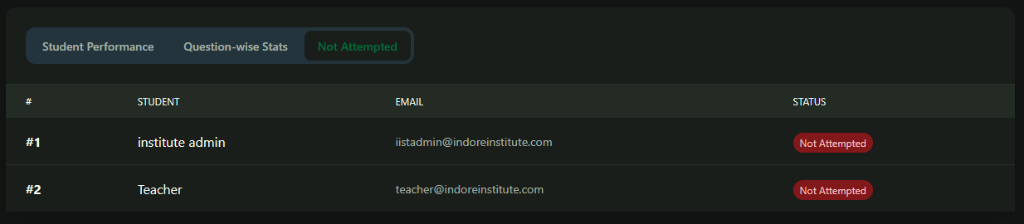
Figure 7.2: Not Attempted / Lazy Student Isolation Filter
7.3 Multi-Attempt Progression & Time Tracking
What is it? Complete audit trail of every submission attempt made by a specific student for any question.
Why use it? Review how a student improved over time, inspect time spent vs. active interaction time, and verify strike logs.
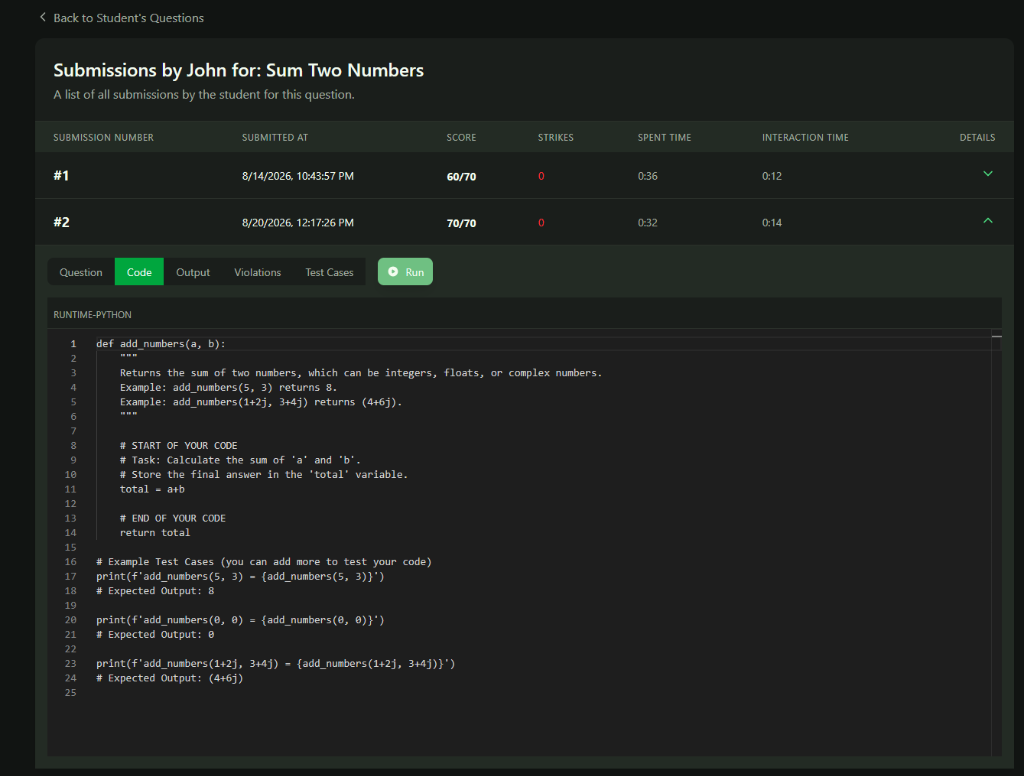
Figure 7.3: Student Multi-Attempt Progression, Spent Time & Interaction Audit
- Attempt History: Track score evolution across attempts (e.g. Attempt #1: 60/70 $\rightarrow$ Attempt #2: 70/70).
- Spent Time vs. Interaction Time: Distinguishes total elapsed time (e.g. 0:32) from active keyboard/editor interaction time (e.g. 0:14).
- Strikes Counter: Red violation counter indicating any recorded proctoring infractions.
7.4 Live Code Inspection Drawer & 1-Click CSV Export
What is it? An interactive code viewer and grading exporter.
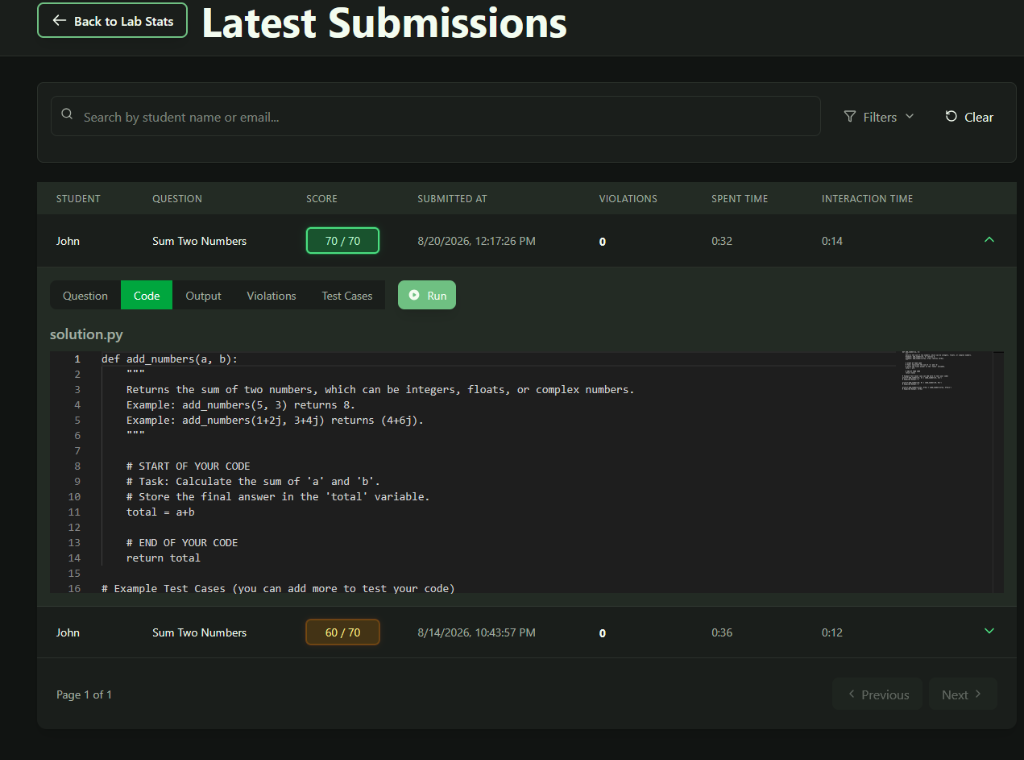
Figure 7.4: Live Code Inspection Drawer with Sub-Tabs & Re-Grading Runner
Key Inspector Capabilities:
- 5 Sub-Tabs: Switch between Question (problem statement), Code (syntax-highlighted student source), Output (console logs), Violations (proctoring log), and Test Cases (passed/failed breakdowns).
- ▶ Run Button: Re-execute the student's code on-demand in the server sandbox to verify custom edge cases.
- Export Data (CSV): Click the green "Export Data" button in the top right of the analytics screen to instantly download the full cohort gradebook spreadsheet.
8. Student Handbook & Practice Guide
Scratchbox gives students a fast, distraction-free IDE to solve labs, track streaks, and practice coding.
8.1 Student Home Dashboard
When students log in with their college email, they land on their personalized dashboard featuring quick metrics, daily challenges, active batches, and freeform sandboxes.
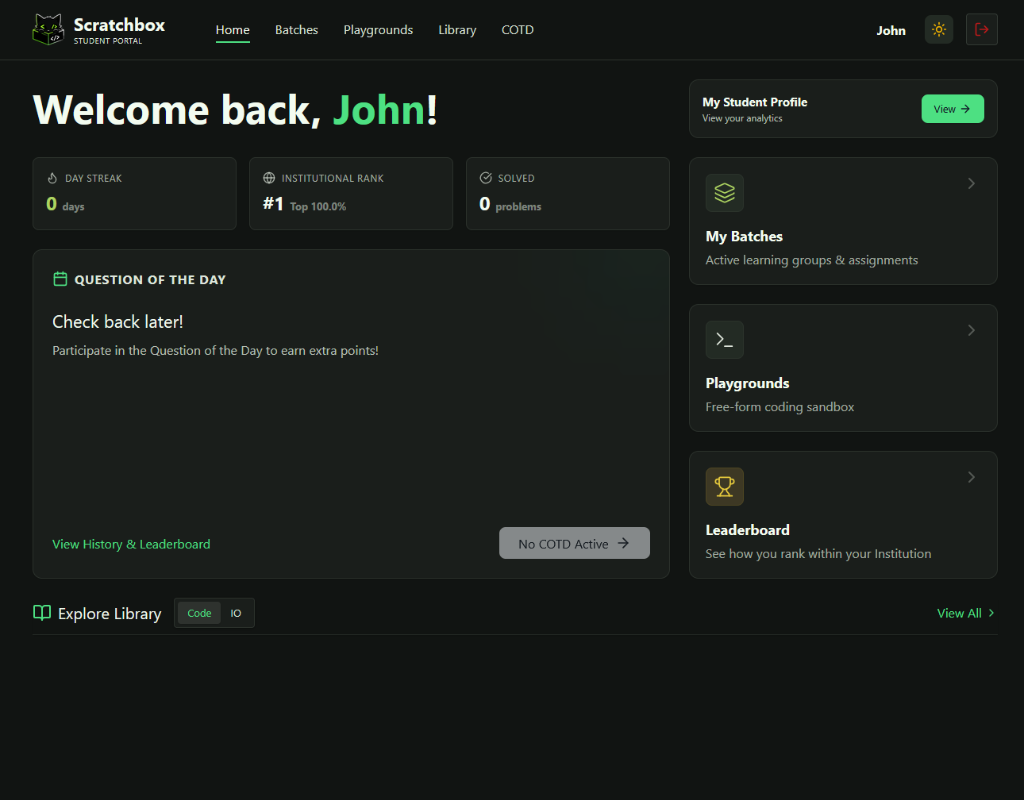
Figure 8.1: Student Home Dashboard (Day Streak, Campus Rank, COTD & Quick Access Cards)
8.2 Enrolling in Batches (6-Character Code)
What is it? Joining your assigned section or cohort.
- Click Batches in the top navigation bar (
/student/batches). - Click the green "+ Join New Batch" button.
- Enter the unique 6-character Batch Code (e.g.
2e56b1) provided by your teacher. - Your batch card will appear immediately. Click "View Courses >" to open your assigned subjects.
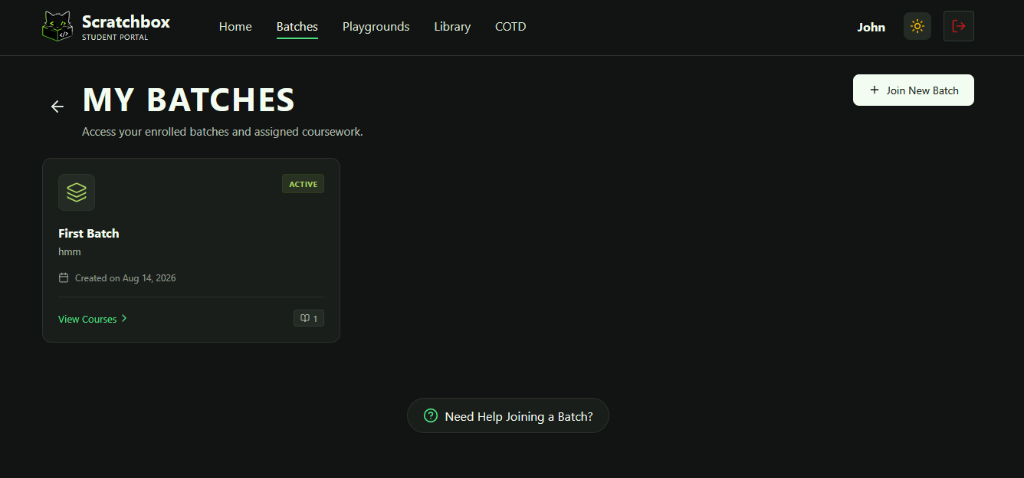
Figure 8.2: Student Enrolled Batches View & Join New Batch Button
8.3 Course Assignments & Lab Catalog
What is it? The complete list of coding assignments, IO challenges, and MCQ quizzes for an enrolled subject.
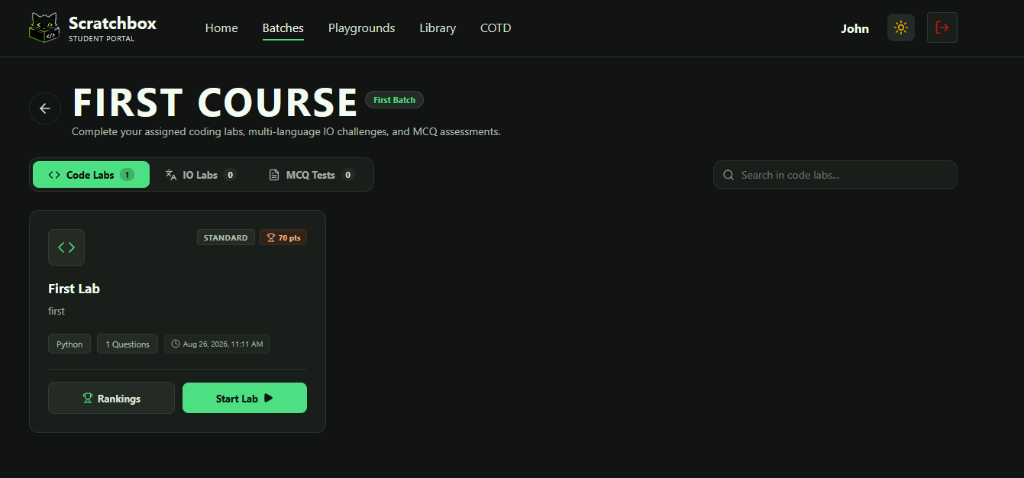
Figure 8.3: Course Lab Catalog (Code Labs, IO Labs, MCQs, Deadlines & Rankings)
- Lab Modality Tabs: Filter between Code Labs, IO Labs, and MCQ Tests.
- Lab Metadata: View total points (e.g.
70 pts), question count, target language (Python), and submission deadline. - Rankings Button: View the live leaderboard for this assignment.
- Start Lab ▶ Button: Launches the interactive cloud IDE.
8.4 The Student Interactive Cloud IDE
What is it? A full-featured in-browser code editor with instant compilation and test execution.
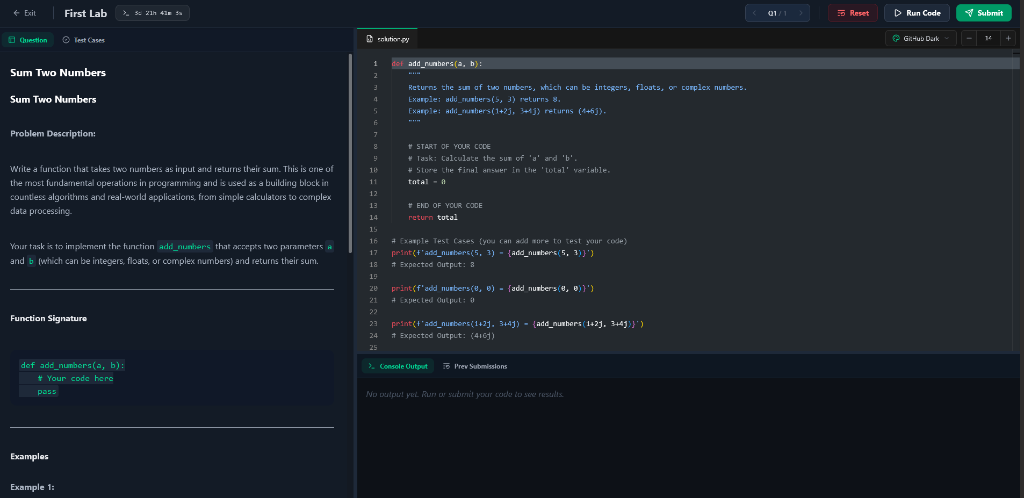
Figure 8.4: 3-Panel Cloud IDE (Problem Statement, Monaco Code Editor, Timer & Output Console)
Key Cloud IDE Features:
21h 41m), Question switcher (< Q1 / 1 >), Code Reset button, and theme switcher (GitHub Dark).
8.5 Personal Playgrounds (Free-Form Sandboxes)
What is it? Private, un-graded coding scratchpads outside of your curriculum.
Why use it? Experiment with new algorithms, write scratch scripts, or practice in any programming language anytime.
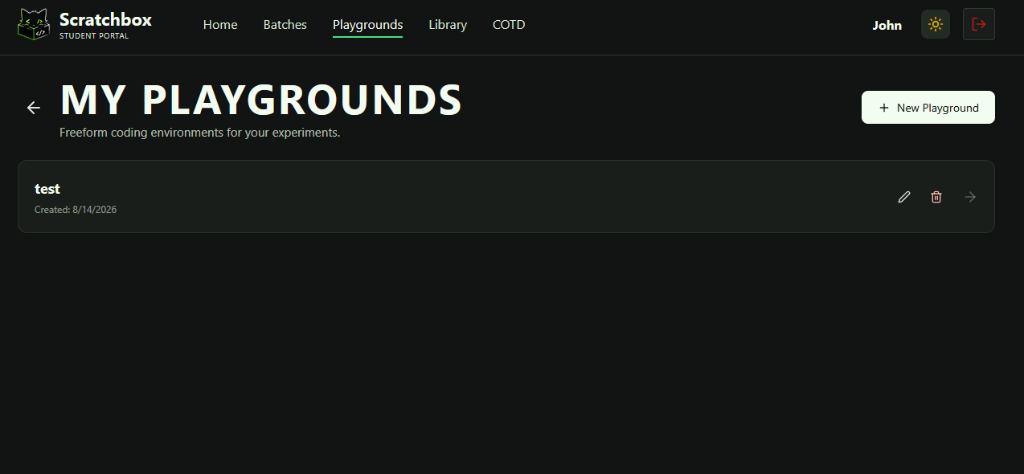
Figure 8.5: Student Personal Playgrounds Workspace
8.6 Community Solutions Explorer
What is it? A peer-learning tab where you can view other students' accepted solutions.
Why use it? Learn clean coding techniques, alternative algorithms, and faster execution tricks from classmates in your college. (Only unlocks after you have solved the problem yourself!)
8.7 Student Profile & Annual Activity Heatmap
What is it? A LeetCode-style profile displaying your solved problem count, campus rank percentile, and GitHub-style green activity squares.
Why use it? Track your day-by-day learning consistency, showcase your solved challenge portfolio, and compare your standing on the college leaderboard.
9. ScratchBot AI Assistant & Smart Automation
ScratchBot provides smart tools to help teachers build labs faster and help students learn effectively.
9.1 AI Question Generation (Prompt & OCR Modes)
ScratchBot enables faculty to create complete, production-grade coding labs in seconds using either natural language prompts or uploaded exam papers.
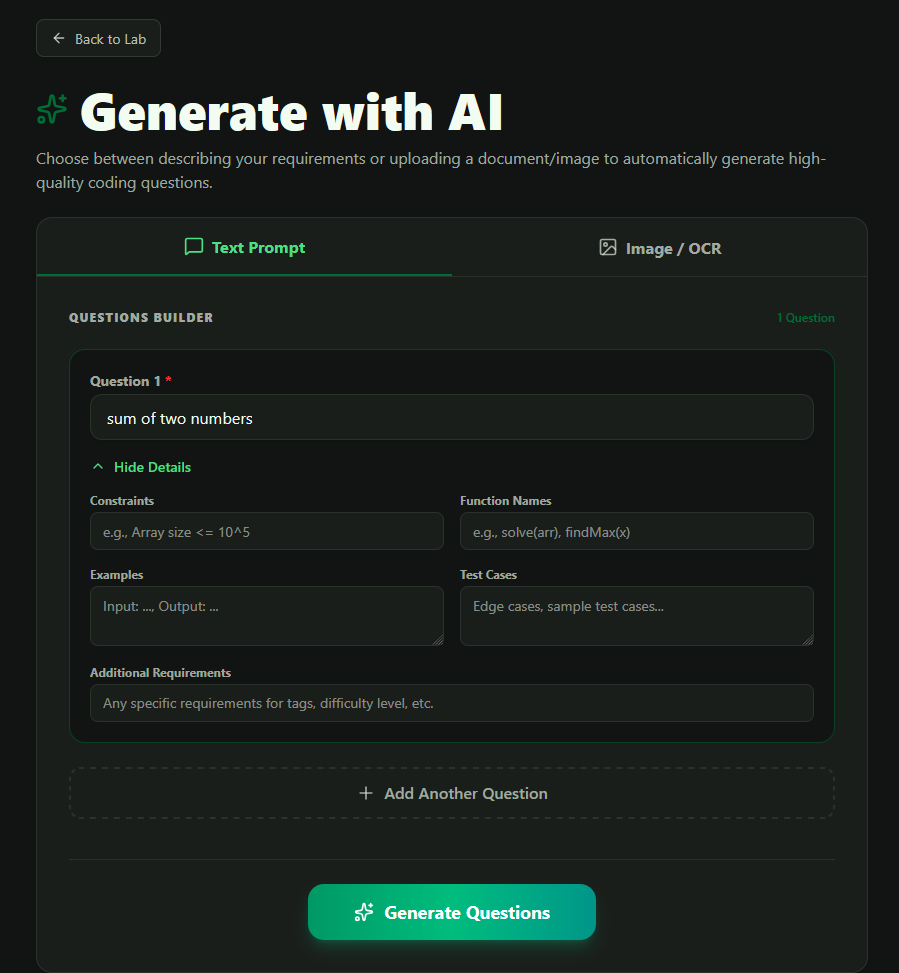
Figure 9.1a: AI Question Generator (Structured Prompt & Constraints Mode)
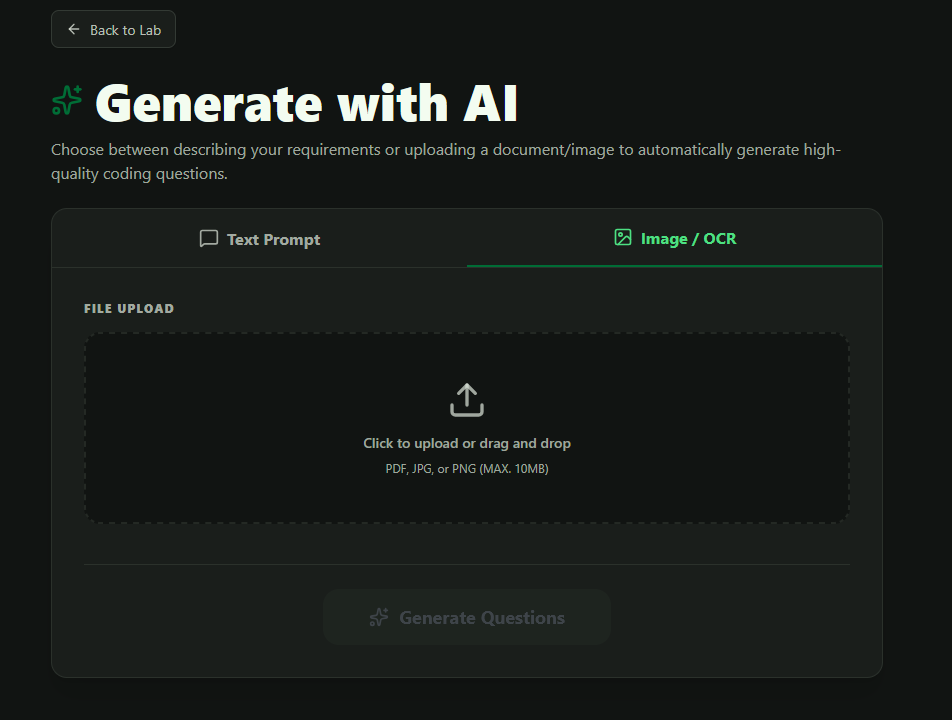
Figure 9.1b: OCR Paper & PDF Exam Digitization Dropzone
Two Ways to Generate Labs with AI:
1. Text Prompt Mode
Enter problem requirements, custom memory/time constraints (e.g. Array size <= 10^5), desired function signatures (e.g. solve(arr)), sample examples, and test requirements. Click "+ Add Another Question" to generate an entire multi-problem assignment at once.
2. Image / OCR Exam Digitization
Drag and drop a PDF, JPG, or PNG (up to 10MB) of a printed or handwritten exam. ScratchBot automatically extracts the text, formats the problem statement, creates boilerplate code, and writes automated test cases.
9.2 Reviewing, Editing & Refining AI Questions
What is it? A dedicated pre-flight review screen before AI-synthesized content is uploaded to your lab.
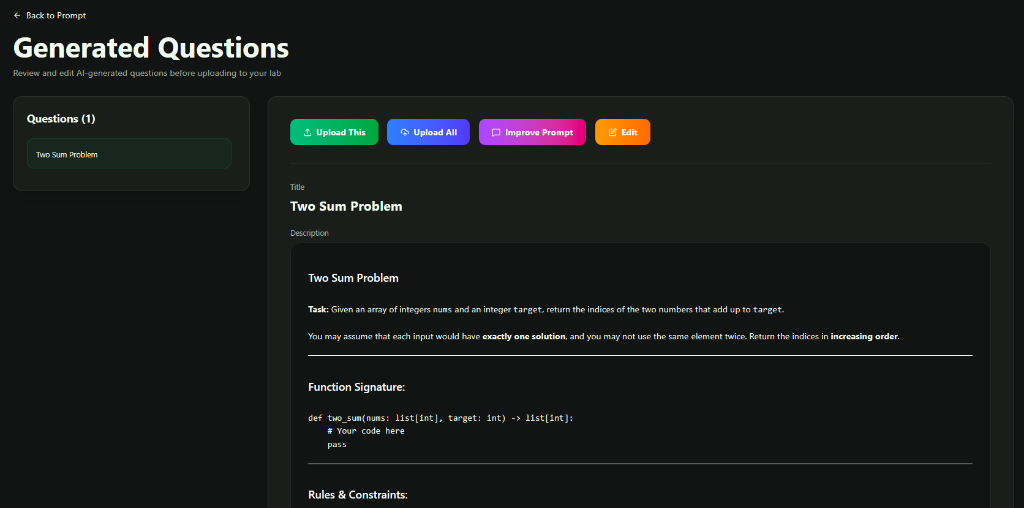
Figure 9.1c: Generated Question Review Panel & Refinement Actions
Review Screen Action Toolbar:
- Upload This (Green Button): Inserts the currently viewed question directly into the active lab.
- Upload All (Blue Button): Bulk-imports all generated questions in one single click.
- Improve Prompt (Magenta Button): Re-opens the AI prompt with your current parameters for quick adjustments.
- Edit (Orange Button): Manually fine-tune the task description, function signature docstrings, or constraints.
9.3 Automated Performance & Anti-Optimization Test Suites
What is it? AI-generated adversarial test suites designed to catch inefficient algorithms and hardcoded cheats.
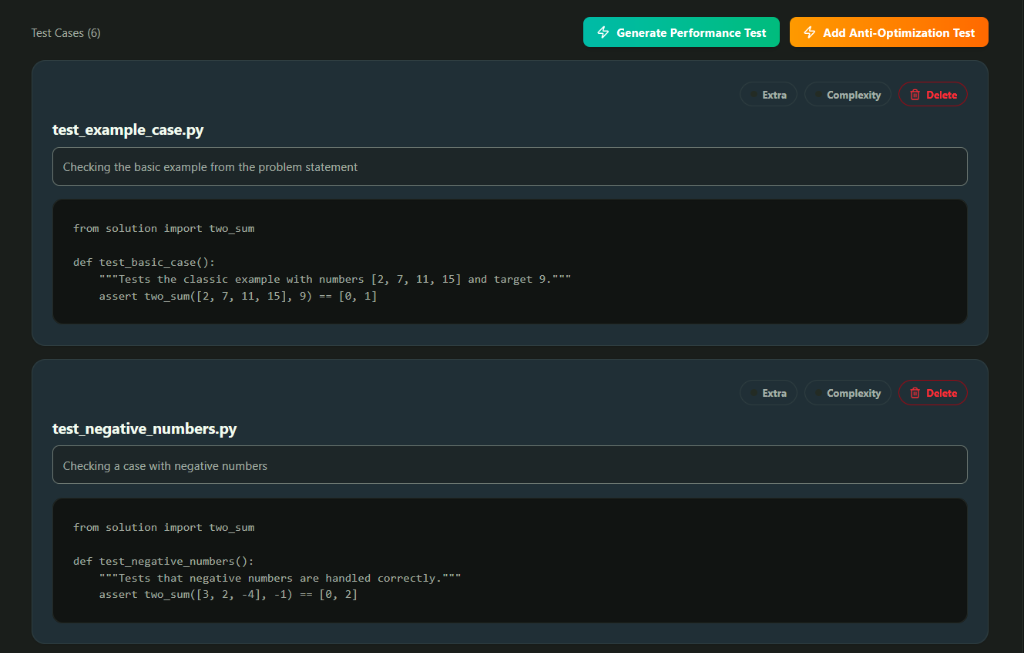
Figure 9.1d: Automated Unit Tests, Stress Generators & Anti-Optimization Suites
⚡ Generate Performance Test
Generates large-scale stress inputs (e.g. \(N = 10^5\)) to enforce time complexity limits and fail \(O(N^2)\) brute-force solutions.
⚡ Add Anti-Optimization Test
Creates adversarial edge cases (negative values, empty arrays, extreme bounds) to prevent students from passing tests using hardcoded `if-else` lookup tables.
9.4 Socratic Hints for Students (Practice Mode)
What is it? An intelligent AI debugging companion for students during practice labs.
Why use it? Unlike generic chat bots that give away the full answer, ScratchBot guides stuck students by asking helpful questions, clarifying syntax errors, and pointing out logic flaws without leaking reference solutions.
10. Troubleshooting, System Statuses & FAQs
10.1 Understanding Submission Statuses
| Status | What it means | What to do |
|---|---|---|
| PASSED | All test cases passed successfully. | Great job! Your score is recorded. |
| FAILED | Your code ran, but the output did not match what was expected. | Check your logic, handle edge cases (like 0, null, or empty inputs). |
| COMPILATION_ERROR | Syntax error; the compiler could not build your code. | Look at the console output to find the exact line with the missing bracket or semicolon. |
| RUNTIME_ERROR | The program crashed while executing (e.g. dividing by zero, index out of range). | Check the error trace in the console to see where the crash happened. |
| TLE (Time Limit Exceeded) | The program took too long to run (> 2 to 5 seconds). | Check for infinite loops (like while(true)) or use a faster algorithm. |
| MLE (Memory Limit Exceeded) | The program tried to use more than 256MB of RAM. | Avoid creating giant arrays or infinite recursive calls. |
10.2 Frequently Asked Questions (FAQ)
Q: What happens if a student's internet drops during a lab exam?
A: No work is lost. Scratchbox automatically saves code in the browser's local cache every few seconds. When the student reconnects and refreshes the page, their code is completely restored.
Q: Can multiple faculty members manage the same course?
A: Yes. You can assign any number of Teachers and Moderators to a single course. All assigned teachers can view submissions, edit assignments, and inspect analytics.
Q: Can students see hidden test cases?
A: Never. Hidden test cases and complexity test inputs are kept strictly on the secure server to ensure academic integrity.